Showing posts with label typography. Show all posts

04 February 2011

Playroom Redone

Visit thecsiproject.com

So here is my first update following the flood.  Our upstairs areas got the worst of it, because the water heater that leaked was in our attic (we have 2, the other one is in the garage, and that one leaked last summer).  After replacing the ceiling and sheetrock they of course needed to repaint as well, so we decided to give the room a facelift with a new color.  

Here is a before pic from when we moved in a couple years ago,


and here it is now.  


Isn't the blue refreshing?  I. LOVE. IT.  I can't believe I left it colorless for so long.  Such is life.

 Since I also had to refinish or replace several of the letters from my alphabet border, and I'm pretty sure I never posted it on this blog to begin with, I am entering this post into the CSI Project this week. :)

Also linking up here:

Join  us Saturdays at tatertotsandjello.com for the weekend wrap 
 up           party!

08 January 2011

Crafting with the Stars - As for me and my house project!


I posted a picture of this project early in December and promised a tutorial.  After Christmas passed, I thought it would be pointless to go back to it.  But Crafting with the Stars Round 2 has begun, so I'm submitting this project there. :)

I was inspired to do this project by something I saw in Hobby Lobby.  I really had to think this one through, especially to "make it mine".  How was I going to apply the lettering?  Directly on the fabric would have been difficult - since there are so many words the lettering has to be small, and I thought that writing or painting or whatever on the fabric might not be legible (although the original HL version I believe had paint stamped letters... and I just couldn't imagine either making that many tiny stamps, or the cost of buying them!)  Then it occured to me that I could write around the edge of the frame with a paint pen.  Vinyl was also an option, but fonting is a hobby of mine and I don't own a Silhouette, so I just don't use vinyl much.   I just about went that route (with writing on the frame itself) when the idea came to me that I could just write on the glass.  Problem solved. 

Next issue, would the key fit under the glass?  Well I just happened to find a deep set frame that was perfect.  Each of these frames (found at Hobby Lobby) is sold with 2 pieces of glass!  Yah!  So by taking one out I had a little room for the raised key.  AND I had an extra piece of glass should I make a mistake with my lettering. 

The key fits very nicely.  I have the perfect canvas for my lettering.  And all is right with the world.  Well, my world anyway. :)


Materials:

deep set frame (love the 50% off sales at Hobby Lobby!)
fine tip paint pen
keys (I found a ring of 4 of them at Hobby Lobby, at 50% off of course!)
fabric
hot glue

Instructions:

Mount your fabric to a solid backing.  These frames came with a styrofoam insert, so I used that.  The drawback - hot glue melts through styroam very quickly.  So I would recommend using another product like Gorilla Glue if you go looking for these particular frames.  I just tend to try hot glue with everything first because it's so cheap.  If you use another kind of frame, cardboard would work great for your backing.  I routinely save boxes to hack up for this kind of thing. You can a) mod podge your fabric tot he cardboard or b) stretch around the edges and hot glue to the back of your cardboard.  I did "b" with my styrofoam and as long as I applied the hot glue to the fabric and waited a few seconds before pressing to the styrofoam, it didn't melt it away. **Make sure as you are mounting your fabric, that if you use a print such as checkers or stripes, that you mount it so those rows lay straight and not slanted.

Mount your key where you want it in onto your fabric covered backing with a thin line hot glue (so it's not visible).


Place the glass over your key/backing to determine placement for writing.  Mark some margins with a dry erase marker.  Write or trace your lettering onto the glass.  I love to freehand but this project needs precision, so I traced.  I used the "zapfino" font on my Mac.  Print out your phrase of choice ("A house of order" also works for this project and would work well for a smaller frame.  My frames are 5x7 in.)  Lay the printed wording underneath your glass (make sure it's centered and straight first!) and trace with your paint pen.  Once dry, lightly rub off your dry eraser marked margin markings

Insert backing and glass into frame and voila!  You're done.


Really not a complicated project at all, it just took some figuring out!

Linking up!


20 December 2010

Bells are ringin', children singin'...

...all is merry and bright!


Easy Christmas decor... painted chip board letters in back, and these fun stand up letters from Hobby Lobby in front!  The back letters are just tall enough to peek out over the top of the front letters.  Makes me smile every time I look at them!

handmade projects

21 November 2010

Give Thanks Banner


 Well, I think I'm all bannered out, now.  I'll wait until Valentine's to make any more. ;)

I loved the print out provided by At Second Street a couple weeks ago, and thought it would make a really fun miniature banner for my entry way.

Materials:

twine
scrapbook paper
buttons
ribbon scraps
hot glue
distressing ink

I reduced the size of the printable so that 2 letters would fit on a 4x6 size of scrapbook paper.  (Don't remember what % I set it at.)  After cutting my letters and distressing the edges, I hot glued each letter to the twine, leaving space in between each for embellishments.  Added pinwheels (formed from scrapbook paper) with a button hot glued to the center of each, and glued those in between the words "Give" and "Thanks".  Found some cute embellishing ribbon in the scrapbook section of Hobby Lobby and tied them on between the letters.  The buttons and ribbons helped weigh the banner down so that the letters don't flip around, which is nice.

Looks so cute in my entry way, don't you think?

Enjoy!!!

{Tuesday is the last day to enter the Crown Bindery Giveaway!!!  Click here to enter!!!}

14 November 2010

Clean out your kitchen banner

Some of you may remember my "clean out your closet necklace".  I made it from a bunch of things I had stashed away for a creative stroke of genius.  And thus was born this necklace.


Well a similar thing happened with this banner, which was made from placemats, dinner napkins, and curtain tie backs.


I had a very specific idea for a Thanksgiving banner in my head, the color scheme and everything.  These items just happened to fall into that vision perfectly!  Here's how it was made.

First I cut the napkins and placemats (from Target) - the yellow just a bit smaller than the burlap since I was layering and wanted yellow on top.  Then I whip stitched a line across the top of the 2... more for looks than functionality, because the placemats were coming unwoven after I cut them.  The material is much rougher than real burlap; it's more like a basket weave kind of texture.  But once I hot glued the twine onto the back of each piece, it held together.

I drew the letters by hand with a brown sharpie... so much easier than using a brush and paint.  Because I love a folky look, imperfections like lines that aren't real straight, etc., appeal to me.  So I just freehanded it.

I finished the banner off with some rosettes, from curtain tie-backs of all things!  I rarely use the tie-backs that come with curtains, but I save them for little things like this... resourceful, eh?  I've had these tie-backs since we moved in 2.5 years ago!  I also tied on some remnants from the napkins as well as ribbon to each end of the banner.

Here's a close-up of some of the details:


Enjoy!

Linking up:

UndertheTableandDreaming 

mmm button

20 October 2010

Monogram Door Sign, Halloween Style


I've walked by the cutest magnetic boards in Hobby Lobby a few times now, just waiting for them to go on sale.  When they got black and white polka dot ones in the store, I was giddy.  And I grabbed one practically as soon as they put up the 50% off sign.

My Halloween wreath has seen better days, so I thought this would be a fun substitute this year.  And I kind of like it hanging on the INSIDE of my door for a change!

I left the board as is, it came with the fun green ribbon and everything.  But I glued on the first letter of our last name to personalize it.

The letter is made of chipboard.  Unfinished, it looks like this:


Only $1, .50 if you get lucky and they go on sale.  Chipboard was perfect for this project, especially since it is lightweight.  

I covered my letter in orange contruction paper first ...  orange because I was going to use orange glitter on top.  If you cover your letter in whatever color glitter you are using, it's not as big a deal if the glitter gets rubbed off in a few spots.

Trace your letter {BACKWARDS} onto your paper, cut, flip, and mod podge onto the surface of the chipboard. Let dry for about 15 minutes.  Apply Triple Thick over that.  This is what Triple Thick looks like, so you don't spend forever searching for it the first time, like I didn't. ;)


The Triple Thick gives this project a more finished look, which is nice since we used cheap chipboard and cheap construction paper in our first 2 steps.  It dries shiny, which is fun with the glitter.  Apply your glitter generously over the surface of the Triple Thick.  Pat it down a bit and let dry overnight.

In the a.m. you can apply your letter to your board however you like.  I used hot glue because it is what I had but I am sure something like Gorilla Glue would work better. :)

At last, enjoy!!!


Linking up with:


23 September 2010

BOO!


I'm kinda excited about today's project. It was so fast, and it's fun, and I scored a deal in the process.

All you need :

cardstock/posterboard/sizing
fabric
frames

There are several takes on this idea. In years past I've done each letter in a different font and mounted it in a frame. This year I wanted something a little different. While perusing Hobby Lobby, I found these small, square (6x6 to be exact), padded bulletin boards, complete with darling gem studded pins. AND THEY WERE 50% OFF.  Perfect!

I found a font I liked (this one is Adobe Caslon Pro Bold) and printed out my letters on cardstock. You'll need something with a little substance. Honestly, cardstock is a little thin. Print out on regular paper and then trace onto poster board, cardboard, or you could even use sizing since we're working with fabric as well.

Cut around you letters carefully and use as a template (opposite side down) on the back of your fabric. Trace with marker and cut out fabric. Then apply fabric to your letters using you preferred mounting agent. I used mod podge in matte.  Because I'm not much of a matchy, symmetrical person, I used 3 different fabrics with the same color scheme.  I could have used different fonts, too... but a lot of the more cutesy or ornate fonts would have been difficult to cut out of fabric.  And you don't want to go too over-the-top or it gets gaudy-looking.

If you go with card stock to back your fabric (and maybe even poster board), you'll want to let your letters dry between 2 sheets of wax paper and weight them down over night (to prevent curling).


When they're dry, mount however you'd like!  In individual frames, on these fabulous bulletin boards from Hobby Lobby, on a banner, or directly onto the wall... go wild. ;)  What I love about the bulletin boards is that I can easily change the word for, say, Christmas...

(JOY, anyone?)

:o)

Linking up with:


BWS tips button

12 September 2010

Spooky Banner Tutorial

Is it really time to start thinking about Halloween?  Or Fall, for that matter?  We're still in the 90s down here in TX.  And had a few days of pure rain, so it's also nice and humid outside right now.  But, I'll play along with all you craftsters and join the Fall/Halloween idea train...

Photobucket

Last fall while my friends and I were out and about looking at model homes we came acroos a cute bedroom with the word "DREAM" hanging from a curtain rod. It was done in a gothic-like font and the letters had glitter on them and hung from ribbons.  This look has since become very trendy, but at the time I hadn't seen anything like it.  We decided we loved the concept, and thought that it would be a perfect idea for a Halloween banner.


Here's what we used:

this font

black posterboard

Elmer's glue

popsicle sticks

brush

black (or orange, or silver) glitter

ribbon


Blow up the letters to the size you want and print out. Cut them out and use them as stencils on black posterboard. (We smoothed out some of the edges on the letters because they were a little too ornate in our opinion).

Reinforce the back of your letters with popsicle sticks if your posterboard is too thin (if you do not, the glue will cause the post board to curl).

Paint your letters (one at a time) with an even coat of glue. Sprinkle black glitter generously over the letter. Let your letters dry overnight.

Using a wide ribbon (if your ribbon is not wide enough your banner will not hang flat), attach your letters using hot glue. Leave about an inch bettween letters... you don't want them to close together or they will overlap when you hang it up. Leave at least a 7 inch tag on each end from which to hang your banner.

Add additional pieces of ribbon for whimsy... choose a variety of widths and textures. I used orange silk, black with handstitched edges, white ric rac and black and white striped. Black and white gingham and polka dots would also be cute! You can also hang the letters individually, each one with it's own piece of ribbon.

Looks great across a mantle, hanging in a window, along the top of an armoire, or at the top of a niche like mine. I thought the letters might also look cute if covered in velvet!

Enjoy!

01 September 2010

DIY Address Sign

When I was in Salt Lake a month ago I went into this really cool hardware store that I can't quite remember the name of (I think it was called Silver Star Hardware).  It had the largest selection of address numbers I have EVER seen.  And I have always wanted to do my house address in big silver numbers, so I keep watch. At an average of $15 dollars per number, it just hasn't happened yet. I was so inspired by the variety of numbers I saw in this store, however, that I knew just how to remedy my situation and get my house address noticed.

First, I spray painted a 9.5 x 24 inch piece of scrap wood in my garage.  You see, this is why I never throw anything away.  My husband still doesn't get it.  I distressed the edges with sandpaper.  Then I found some fonts I liked - one for each number to make it fun and quirky (that's me!).  I made a stencil for each number and traced those onto a product called Create With Metal Designer Metal Sheets.  They come in a variety of gauges and colors.  I used .005 thick, 36 gauge soft aluminum.  SO EASY to work with.  Not like some other kinds of metal that have left me bleeding and suffering for days.  (What some people will do in the name of creativity, huh?)  I cut my numbers out and attached them to my wood with Elmer's Wood Glue.  I am sure there is something more effective than that, but it's what I had.  I knew hot glue would probably warp the metal, so that option was out.  To reenforce the numbers (and give it somewhat of an industrial appeal) I put a few nails in each number as well.

HERE is the finished product!


I love it!  Not sure where I am going to put it quite yet.  I set it here in the meantime.  What do you think, is it fine where it is? 


Or should I hang it on that left pillar?


Hmmm, I am undecided.

Whilst I am showing off my front porch, check out this darling bench I picked up at Tuesday Morning!  I've been looking for just the right one since we moved in 2 years.  And there it was all the sudden, beckoning to me.  When I'd just about given up!  Isn't that how it always how is with love? ;)

19 February 2010

Stamp Initial

This projected was entered into:

Visit thecsiproject.com


I love letters and I love typography.  Once upon a time I designed fonts for a scrapbooking website, now I design them for myself. :)

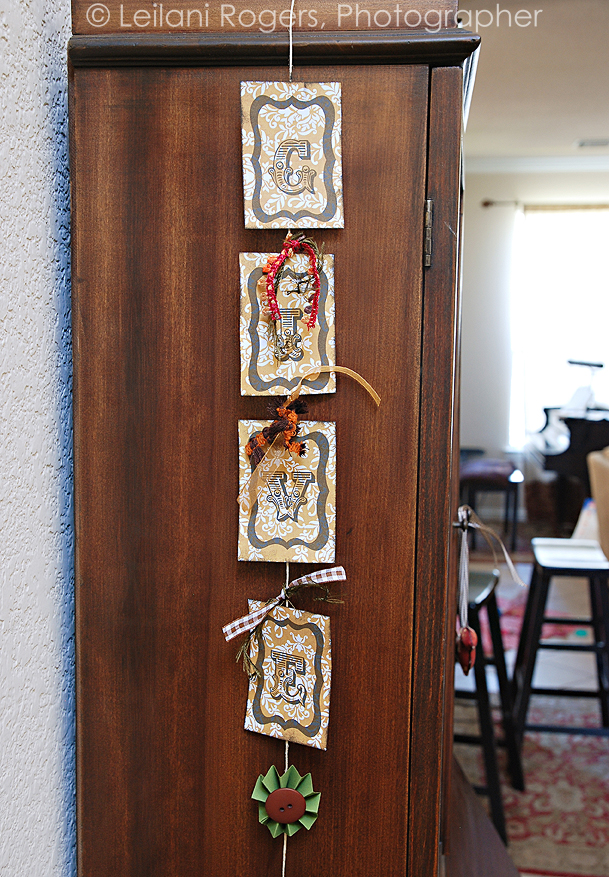
I have words and letters all over my house.  Actually, it's brinking on the edge of overboard, lol.  I came up with this idea while watching iCarly of all things.  Hey, you can spot a good idea just about anywhere, know what I mean?  Anyway, in their kitchen are letters all over the wall and some of them look like big stamps, the old kind like they used with printing presses.  And so this idea was born.  I needed something tallish and skinny for this window beside my front door and I think this is just perfect!

Want to make one of your own?  Here's how!

Materials I used:

6x12 in. canvas
3 coordinating scrapbook papers
(distressing) ink pad
mod podge
cardboard
pencil
scissors

The first thing I did was cut a scrap piece of paper the same size as my canvas.  Then I sketched out my initial, using the edges of the canvas to dictate my size.  I wanted my letter to be as big as my canvas so I made sure it met all the edges of my "canvas".  I cut out my letter and then used it as a template on some cardboard.  If you have an old box, this is a great way to recycle it.  The purpose of the cardboard, in case it isn't obvious, is to give the same 3-D effect that a real stamp would have.

I cut out my cardboard initial.  Then I traced the template onto the scrapbook paper I wanted to cover my cardboard initial with.  When I traced the template onto the scrapbook paper, I traced it a little wider in size, so I had some edges to wrap around the cardboard initial.  It might have been more accurate for me to just measure and additional 1/4 in. all the way around, but I'm not very particular and like to be done already. ;)


I then traced my canvas onto a 2nd piece of coordinating scrapbook paper (for the base), and the edges of my canvas onto a 3rd piece of coordinating scrapbook paper (to hide the sides and add a pop of unexpected color).

Next I mod podged everything together!  Started with my base/canvas.  Let it dry well.  Then I mod podged the edges of the canvas.  Let it dry well.  Then the surface of my cardboard initial.  Let it dry well.  Then the edges of the initial, wrapping as I went (this is messy!).  Let it dry well (detecting a pattern here, are ya?). I inked (or distressed) the edges of the canvas, and the initial.  And then I hot glued the initial onto the covered canvas base.  Since the cardboard is thick, it is more secure with hot glue than with mod podge.


Lastly, I put one last coat of mod podge over everything.  Be sure the let the distressing ink dry before you do this, or it will smudge!  I have wondered if it is better to distress/ink on top of mod podge.  But I haven't tried yet.  Will it dry or is it like writing with marker on certain surfaces; it just stays wet?  If anyone has tried it, let me know!

I used a plate rack to display mine, stacked on top of some books... but the canvas will hang nicely on the wall as well.  If you're really ambitious, I think this would be a cute way to display a child's name in their room!

Enjoy!

I am linking up with: