She's been shopping for months. She's been planning special family outings. She's been volunteering to help with her kids' class parties. She's thoughtfully decked the halls of her home. She's baked enough to feed a small army. She's enjoyed quiet evenings by the fire with candles burning and the uplifting sounds of Christmas music wafting through the air. She's noticed the magic that catches under the wings of all those around her, and finds it rejuvenating, refreshing, comforting... one purpose that binds us, everyone. But now, 3 days post Christmas it has all come to a screeching halt. Everyone has forgotten Christmas cheer. The radio station is back to playing easy listening muzac. The stores are filling up with Valentine's candy. The neighbors are taking down their lights and dumping their Christmas trees out by the curb.
She pauses in front of the nativity scene on display in her home. She thinks of ways to carry on the spirit of Christmas throughout the year, because this kind of joy can be found outside of gifts and lights and frosted sugar cookies. It should resonate in our hearts every day of the year. We can make more time to gather around and read from Luke. We can gather more often at the dinner table and enjoy a bounteous meal. Our homes can always be a made to feel warm and inviting. And there certainly needs to be no reason for giving to others.
As she contemplates where to begin, which ornaments or Christmas tree to pack up first, her heart feels lighter now. She thinks of the New Year and the possibilities it holds for more dedicated family time, service to others, and meditation on her many blessings...

28 December 2009
24 December 2009

23 December 2009
Butcher, baker, candlestick maker...
Okay, so maybe I have only done the latter 2, but I've been a baking fool today. 11 loaves of bread kneaded and baked with my own 2 hands.
I cannot help but think of my mother when I bake. It's not even that I remember her baking a ton, it's that baking - especially bread - reminds me that I come from a long line of women that provided for their family in the graceful way that only a woman can do. And amongst all the domestic things I do, baking is the most empowering and enjoyable. I feel more like a "domestic goddess" when I bake than say, do laundry. And not because I am trying to achieve some "Stepford Wife" status but because the goods that come out of the oven are truly appreciated, and they are truly a sign of my affection for my family (and friends) and my devotion to being a nurturer.
So here are 2 recipes that might help you define yourself as more of a domestic goddess.
Oatmeal Bread
2T + 1t yeast
1c warm water
2t sugar
Combine and let stand for 10 minutes.
Add 4 eggs and mix for 5 minutes on medium speed with beater.
In separate bowl with a dough hook, combine:
3 c hot water
2 c rolled oats
1 c molasses
1 c minus 1T shortening
2T salt
*Of about 12 1/2 c flour - add enough to make a thin, smooth batter.
Let rest 10 minutes.
Again using dough hook, combine yeast mixture with oatmeal mixture.
Add remaining flour in small amounts until dough is no longer too sticky to handle, and smooth. I need by hand for at least 10 minutes, you can also use a mixer if you have one that is large enough.
Let dough rise until double in bulk (1 - 1 1/2 hrs.)
Portion into 5 loaves and place in prepared greased pans. Cut slits on each loaf, brush with vegetable oil and sprinkle with some oats. Let rise again until double in bulk.
Bake at 375 for 30-35 minutes or until evenly browned.
I make 2 large loaves and 6 small for giving away. For the small loaves: 15-17 minutes. For the large loaves: 28 minutes.
My mother-in-law's Cinnamon Bread
1c milk
1/4c shortening
1/4c sugar
1t salt
1T yeast
1/4c warm water
1 egg beaten lightly
3 1/2 - 4c flour
This is a small recipe, it makes 1 large loaf. If you want to make many loaves I suggest doing 4 times the recipe, which yields 6 medium sized loaves. But only use 3T yeast, not 4.
Activate the yeast in a large bowl with the warm water. Over stove, scald your milk. This is necessary in helping your dough rise. Add shortening and let melt over low heat. Add sugar and salt and let dissolve. Cool. Add beaten egg, and let cool some more... just enough that it won't kill your yeast. Add to yeast. Transfer to a bowl, unless you have a dutch oven sized pan you can scald you milk in. Add flour until you can handle the dough, about 5 minutes. Grease a large bowl or transfer to a greased bowl and let rise until double in bulk, 1- 1/2 hours.
Punch down. Let rest for 10 minutes.
Roll out into a rectangle about 14-16 inches long and about the width of a bread pan (obviously you will need to divide the dough first if you are making more than 1 loaf). Brush with milk and a mixture of :
1/4c sugar
1 1/2t cinnamon
Roll up jelly roll style lengthwise. Put into a well greased large bread pan and let rise another hour. Brush top with cooled, melted butter and sprinkle with more sugar/cinnamon mixture.
Bake a 350 for about 40 minutes. Remove from pan immediately.
ENJOY!!!
Like drinking liquid chocolate...
This is the hard stuff. ;)
INGREDIENTS:
1 cup whole milk
1/3 cup heavy cream
1/4 cup sugar
5 oz semisweet chocolate, chopped
PREPARATION:
Simmer the milk, cream and sugar together until just boiling. Stir in the chocolate until melted. Don't let it boil.
Warning - very rich. I've used coconut milk in the place of the heavy cream, it's less fattening but everything is relative when you are talking about drinking chocolate like it's water. Lol. I also dilute half a mug with 1%milk, so ratio milk:hot chocolate is 1:1.
YUM!
20 December 2009
In keeping with tradition...
I will repost my years old recording of Gesu Bambino. Got to play it again in church today... always puts me in the Christmas mood! Enjoy. :)
Gesu Bambino
13 December 2009
And the winners are...
Oh, did I forgot to mention that I would be out of town Friday and Saturday? Whoops. Sorry to have increased the suspense for everyone.
The winners drawn at random, are Celeste Louise, who won the Wall Candy Arts removeable decal!
And Laura Smith, who won the notNeutral Wood Bock Set!
Congrats ladies, and Merry Christmas!!! Look for an email from me!!!
10 December 2009
Wrapping Ideas

I'm linking up with The Creative Girl today for fabulous Christmas wrapping ideas.
I LOVE to wrap gifts. And I was taught how by the best. My mother-in-law is an Interior Designer/Decorator Extraordinaire and I have learned so much from her (and I'm not just talking wrapping paper).
She finds beauty in the simplest things and makes simple things beautiful. I remember the first time I saw one of her wrapped gifts. I was in awe. In fact, I owe her credit for the one gift I have wrapped in my house at the moment (lol). I have saved this box for YEARS now... since before my husband and I were actually married. She gave me some Victoria Secret lotion - Pear Glace - for my birthday one year. (Remember when that scent was all. the. rage?) She put it inside this gorgeous box, which I have preserved and set out among my Christmas decorations every single year.


Now let's see if I remember correctly how she did this. She started with a plain paper mache box. She spray painted it gold and then wiped silver paint over the top with a rag... while the gold was still a little wet, giving it a swirly/marbled effect. Paper Mache soaks up paint pretty fast so it may have required more than one coat of gold...
She always uses the most gorgeous ribbon, too. I love ribbon myself. This ribbon (which is the original) is perfect for this box. I tucked in some fresh evergreen under the ribbon and tied an ornament on top (cheap at Target).
I love to use dried flowers and berries and the like on top of gifts. Even fresh flowers are fun... save those little tubes the florist gives you for the ends of your flowers and a fresh flower on your gift won't wilt before the end of the party. Spray paint magnolia leaves in metallic shades and tie on with ribbon. Copper is my favorite.
I love to tie little things onto the tops of my gifts, too. Homemade tags are so fun, especailly this time of year. You can cut pics out of the thousands of catalogs that are arriving in your mailbox, or use scrapbook paper and make your own.
I also got the idea to use buttons strung on wire, and rocks hot glued to ribbon from my mother-in-law. See what I mean? Fount of creativity, that one.
Have fun with your presents this year. And if you want a fun read on wrapping gifts, check out this book by Rachel Ashwell - The Gift of Giving.
Remember to eneter the giveaway for the Wall Candy Arts Wall Decal and notNeautral Wood Block Set here. Comments closed at midnight CST tomorrow, Friday, December 11!
07 December 2009
Wall Candy Arts RoCoCo Decal and notNeutral Wood Block Set Giveaway!
I get so swept up in Christmas... I love to shop and I love to give. And I use the excuse of giving to shop more than I should. Lol. But this time I didn't have to do any of the work. Which is lovely!!!
I've got 2 really fun, unique products featured here, courtesy of http://allmodern.com. All Modern sells tons of great stuff - for home, for office, for baby and children. Some of their baby cribs and online toys are just fab. And of course (drumroll, please) you must check out what they offered to let me give away to one of you lucky folks...
Zees removeable wall decal by Wall Candy Arts, which works like a chalkboard I might add (how cool is that?):


OR zees awesome set of wood blocks, by notNeutral:


06 December 2009
Having creative friends, it's a good thing!
Let's face it, the best ideas come from other great ideas. I do believe as Tolstoy said that "art is imitation". We have to have seen something beautiful in order to know how to recreate beauty.
I am fortunate to have many creative friends. They inspire me and help get my own creative juices flowing. And we take care of each other... nurturing each other's ideas, helping bring them to fruition. Sharing our talents.
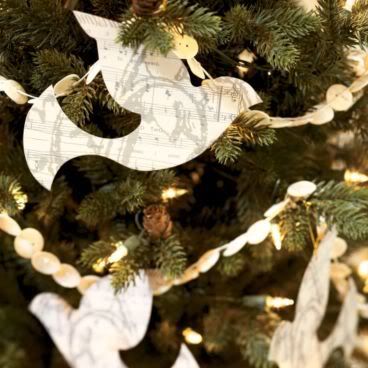
Char at Crap I've Made recently recreated these awesome peace ornaments from PB. I had been eyeing some fun ornaments in the Ballard Designs catalog, so I followed her lead and recreated my own spin off incorporating the peace sign.
Here's theirs:
And here's mine:

I even have a few simple clear ball ornaments along with that I simply painted peace signs onto using glitter glue (you know, the cheap stuff your kids like to play with?).
Now I'm not as neat as Char. I didn't cover my edges or anything. I also don't do great, detailed tutorials with step by step pictures. I just don't like to, lol. But i will tell you exactly what I did, and I will show you more pictures and other ideas that have spun off this one.
Materials used:
cardboard
dove template (see below)
scrapbook paper
silver sharpie
mod podge
triple thick
brush for application
First, trace your template onto cardboard or other stiff backing.

Cut out and repeat with your scrapbook paper.
Before cutting out the template drawn on your scrapbook paper, find yourself a cup that is about the right sized circle for your distressed peace symbol. Find a corner to trace the rim of the cup on - you want just a hint of it to show. *Lightly* trace your circle and fill in the remainder of the peace sign. Get your silver sharpie out. If you look at mine closely I just barely shaded in my peace sign, I used quick, short, straight brush strokes on either side of the single line I'd drawn with my pencil, keeping the thickness even all the way around. I realize not everyone can freehand this kind of thing, but it really just takes a little bit of practice. You might want to play around with a scrap piece of paper first. :)
Now you are ready to cut out your scrapbook dove and mod podge it onto your cardboard backing. Now, I call these ornaments but mine are not actually hanging on my tree. I opted to stick them in with evergreen boughs in various places around my house - in a bowl as a centerpiece, and on my mantle. If you want it to serve as an actual ornament, you will obviously need to punch a hole before you apply the mod podge.
Let the mod podge dry about 15 minutes and apply your triple thick as a top coat. let the triple thick dry for at least 20 minutes. The triple thick is shiny, so it makes the ornament look classy, not like you just slapped some paper on an old piece of cardboard! Love that.
Here are some additional pictures!
In a bowl on the center of my craft room table (and the big reveal on my new craft room is coming very soon):


And since I was really feeling the natural color scheme Ballard has going on this year, I made a paper chain:

Lastly, here is a full shot of my mantle, with little silver birdies tucked in there, a crystal bead wreath, some ornaments up inside my sconces, and who knows what else to come... I'll continue to add to it, probably:


Enjoy!!!
*This project was entered into the contest at:
01 December 2009
On why I need designer jeans.
soap!),...................... and Saks Fifth Avenue.
That's right, I went shopping for myself on Black Friday this year. They were having a sale on their designer jeans and I was all over it.
It has taken a while for me to "get" the rationality behind a $100+ pair of jeans. Since highschool I've taken the middle road and worn mostly Gap jeans. Express if I am feeling extra sassy. And there is nothing wrong with them - they come in tall sizes (which I need) and they fit nicely enough. Until about noon or so when the butt is sagging (and no its not because of MY saggy butt, but rather material that doesn't give... that's my story and I'm stickin' to it).
It's hard to describe what it feels like to try on a nice pair of jeans. They move with you (not against you). The back pockets are in the right place (yes, even after you put them on). And they feel. so. good. In fact, trying on jeans has never been so fun when you are doing it in a room large enough that your elbows aren't knocking into the walls around you, and your salesperson is running all over the store for you, as determined as you are to find "the one" pair that will take you up a notch.
I guess my opinion on the matter shifted when I attended a photography seminar a couple months ago. We talked a lot about image, marketing and branding. 3 important targets on the business side of photography that I was severely lacking. Branding is the "intangible, personable and powerful message you portray" (Christopher Becker). It communicates who you are, what you do and WHO you do it for. And the benefits of branding yourself are countless... but the one that stood out most in my mind was maintaining a "top of the mind" status. Moreso than prestige, or greater recognition, or being at the head of the trend, I think that "if you can believe it, you can be it" mentality generates the most success.
So here I am dressing for the job I want. I'm communicating my worth.
Too bad I am often simply on my way to Walgreens.