29 November 2010

Giveaway with Embellish Kids!!!

Happy Monday everyone!  I hope you all enjoyed your holiday festivities.  I ate myself into a coma and just woke up this morning to real life going on all around me.  What's up with that?

One thing that did help get me out of bed this morning was the chance to tell you all about a great boutique I was introduced to a few weeks ago.  Lisa of Embellish Kids had a fashion show a few weeks ago to launch her line of handmade children's clothing, and my daughter Sasha got to be in it!   Lisa's clothes are made so well, and they are so darn cute, that I practically tackled her about doing a giveaway on my blog!

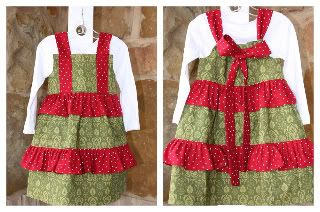
Have a looksie at a small sampling of the goodies she's selling in her Etsy store:

Photobucket
She even makes things for little boys!  Don't you love this vest?

Photobucket

And here's what she's got whipped up for the holidays!
Photobucket

Now for the exciting part.  Lisa is giving one My Many Colored Days reader one of her delicious capelets!

Photobucket

Aren't these yummy? I was in love with them the minute I saw them!!! So, so, so cute. They are available in sizes 2T-7 and come in a giraffe print with burnt orange pom pom fringe, zebra print with bubble gum pink pom pom fringe, or leopard print with red pom pom fringe.  The inside of the capelets has a funky yet well coordinated fabric to match.

You get to choose which one you want!  I'm serious!  Here's all you need to do to enter (leave a comment for each one!):

FOR 1ST ENTRY:  Go visit Lisa'e etsy store and come back and tell me what your favorite item is!

FOR 2ND ENTRY: Add her shop to your favorites!

FOR A 3RD AND 4TH ENTRY: Become a My Many Colored Days follower if you haven't already done so!  You don't want to miss future giveaways, do you?

FOR 5TH ENTRY: Buy something!!!  Because all readers get a 20% off discount using this code - LEI2010


FOR 6TH ENTRY:  POST ABOUT THIS GIVEAWAY ON YOUR BLOG, FB PAGE, OR TWEET ABOUT IT!!!


6 ways to enter, and you especially can't go wrong if you use that discount code!  Lisa's prices are already so reasonable, so shop away and get a head start on Christmas gifts!

This giveaway will close Friday, December 3 at midnight CST.  Open to US residents only.

Good luck!!!


24 November 2010

Happy Thanksgiving!


Just wanted to wish everyone a happy Thanksgiving tomorrow... I'm disconnecting for a few days but I hope you all enjoy your day with your families!  Eat, drink and be merry, okay?

And, the winner is...

The winner of the 9x11 binder, pocket folder, bookmark and pencil from Crown Bindery is:

#20 luckyduck Cheyenne, who said "I love the clipboards! Ordinary items look so cute when you dress them up in pretty paper."

I guess you are pretty lucky, Cheyenne!  Congratulations!!!  Look for an email from me!

23 November 2010

Don't forget!!!


Don't forget to enter the Crown Bindery giveaway!  I'd love to get over 50 entries. :)

It ends tonight at midnight EST!!!

Sweet, sweet deal for bloggers!

I found out that Shutterfly has got a pretty sweet deal for bloggers!  Look HERE for details.

I love Christmas cards.  Love to send them, love to receive them.  I enjoy hearing what's going on in the lives of friends who have moved far away.  And I love to see how the families have grown!!!  I have a card tree that goes up every year so that we can see the faces of our dear friends and families throughout the holiday season.  That's what makes Shutterfly's card selection so wonderful.   There are some pretty darling ways to display your family picture for Christmas each year!  My experience with Shutterfly in the past had been with their photo books.  And they do such a great job.  I am sure the cards are just as high of quality, if not better.

We just had our family pictures taken, sneak peek to come! So I am pretty excited to pick out cards from Shutterfly this year!  Here are some of my favorite holiday photo cards from their collections this year:


 You can get stationary cards or folded cards.

And how about Christmas labels?  I hate writing more than I already have to.  Lol.  Plus, these are so cute!  Here are my favortie designs:


How will I ever choose?

21 November 2010

Give Thanks Banner


 Well, I think I'm all bannered out, now.  I'll wait until Valentine's to make any more. ;)

I loved the print out provided by At Second Street a couple weeks ago, and thought it would make a really fun miniature banner for my entry way.

Materials:

twine
scrapbook paper
buttons
ribbon scraps
hot glue
distressing ink

I reduced the size of the printable so that 2 letters would fit on a 4x6 size of scrapbook paper.  (Don't remember what % I set it at.)  After cutting my letters and distressing the edges, I hot glued each letter to the twine, leaving space in between each for embellishments.  Added pinwheels (formed from scrapbook paper) with a button hot glued to the center of each, and glued those in between the words "Give" and "Thanks".  Found some cute embellishing ribbon in the scrapbook section of Hobby Lobby and tied them on between the letters.  The buttons and ribbons helped weigh the banner down so that the letters don't flip around, which is nice.

Looks so cute in my entry way, don't you think?

Enjoy!!!

{Tuesday is the last day to enter the Crown Bindery Giveaway!!!  Click here to enter!!!}

18 November 2010

Giveaway with Crown Bindery!

THIS GIVEAWAY IS NOW CLOSED!!!

Over the summer I went to the Renegade Craft Fair in Austin.  Had tons of fun strolling around, spending too much money, and admiring the talent of others.  I met a few gals who I thought had some pretty genius creations.  One of them was Carla from Crown Bindery.  She sells these amazing laminated binders in all sorts of fun, fun colors.  After finally deciding which delicious binder I wanted, and going home and getting FABULOUS use out of it, I contacted her about doing a giveaway on my blog.  She was so generous... she sent me not only a 9x11 binder, in the most scrumptious fall colors and patterns, but a pocket folder and fun bookmark and pencil as well!  **For one of you lucky readers!  Yeah!

Here's just a few pics I snagged off her etsy site so you can see how fun organization can be when you buy one of these babies for yourself!


It really will make you want to be more orderly.  Promise. Especially with all there is to choose from: three ring binders, notebooks, journals, notecard binders, bagtags, and bookmarks created using beautiful papers, heavy duty laminate pouches and book rings. Crown Bindery also has accessories for your notebooks... cardstock pockets, dividers and printables.

And that's not her only shop.  Check out The Crown Paperie , where she sells papered clothespins, clothesline kits (clothespins plus hanging wire, hookeyes), clamp hangers, children's hangers and clipboards which provide colorful options for organizing paperwork in the handmade home office.


There's also The Paper Crown as well: paper chain DIY kits, paper packaging pockets and paper stacks created from the cutting room floor of the back workroom at CrownBindery.etsy.com.


Love that she uses every scrap of paper she can.  So very green and resourceful. Says Carla, "Paper scraps from Crown Bindery (my primary Etsy venue) head in two directions...  Smaller pieces end up at Crown Paperie as paper chains and paper pockets.  Larger paper pieces mix with decoupage medium and end up at The Papered Crown."

Oh, and if that weren't enough... Carla also has a blog!  It's called Homemade Office  and she highlights all sorts of fun stuff there.  You all should follow!  Ok, lest I sound like I've developped a girl crush...


To be eligible for this giveaway, you can:

1.) become a new follower of My Many Colored Days
2.) visit one of Carla's shops and leave a comment telling me what your favorite product is...
3.) blog about this giveaway

AND/OR

4.) *heart* Carla's fun shop(s)! (That's a given, right? I mean... how could you not?)

{Leave a comment for each thing you do, for a possibility of 4 entries per person.}

The winner will receive the previously mentioned 9x11 binder, pocket folder, bookmark and pencil. :)

**This giveaway will close Tuesday, Nov. 23 at midnight EST.  Winner will be announced Wednesday, Nov. 24.  This giveaway is open to U.S. residents only.**


THIS GIVEAWAY IS NOW CLOSED!!!

16 November 2010

Autumn Garland


I've been stringing a lot of things this month!  I love garlands and banners for the holidays...

This garland was made using a pack of vase fillers from Target, as well as some fun pumpkins I bought in my grocery store's floral department, and cinnamon sticks.

I used thin, thin twine to string everything.  Looks like this:


Tied a fun pleated ribbon onto each end...


Didn't take me long at all!  So go whip one up for yourself!


Linking up:


BWS tips button

PS - I've got another giveaway coming up!  Stay tuned!!!
 

PPS - My friend Kierste from Brown Paper Packages is having a giveaway for a $50 gift certificate from the Vintage Pearl!  Go enter!!!

14 November 2010

Clean out your kitchen banner

Some of you may remember my "clean out your closet necklace".  I made it from a bunch of things I had stashed away for a creative stroke of genius.  And thus was born this necklace.


Well a similar thing happened with this banner, which was made from placemats, dinner napkins, and curtain tie backs.


I had a very specific idea for a Thanksgiving banner in my head, the color scheme and everything.  These items just happened to fall into that vision perfectly!  Here's how it was made.

First I cut the napkins and placemats (from Target) - the yellow just a bit smaller than the burlap since I was layering and wanted yellow on top.  Then I whip stitched a line across the top of the 2... more for looks than functionality, because the placemats were coming unwoven after I cut them.  The material is much rougher than real burlap; it's more like a basket weave kind of texture.  But once I hot glued the twine onto the back of each piece, it held together.

I drew the letters by hand with a brown sharpie... so much easier than using a brush and paint.  Because I love a folky look, imperfections like lines that aren't real straight, etc., appeal to me.  So I just freehanded it.

I finished the banner off with some rosettes, from curtain tie-backs of all things!  I rarely use the tie-backs that come with curtains, but I save them for little things like this... resourceful, eh?  I've had these tie-backs since we moved in 2.5 years ago!  I also tied on some remnants from the napkins as well as ribbon to each end of the banner.

Here's a close-up of some of the details:


Enjoy!

Linking up:

UndertheTableandDreaming 

mmm button

13 November 2010

And the winner is...

Thanks to all who entered the giveaway for CSN Stores!  Looks like several of you who said you followed didn't actually register as new followers (it's a 2-step process, and many forget to click through the 2nd step), but I counted your entry anyway because I'm nice like that.  But if you really want to follow my blog - I would be delighted if you tried again!  There will be more giveaways in the next few months and it would be a great way to be informed of those, plus who doesn't love making new bloggy friends?

Without further ado, the winner of the $45 gift certificiate (via random.org) is...

#67, Felicia K.  who said "I love CSN and searching through their baby selection!"

Congrats Felicia!  Enjoy picking out something fun!  Look for an email from me soon. :)

11 November 2010

Pottery Barn Inspired... Give a little thanks wreath

I saw this wreath in the Thanksgiving Pottery Barn catalog that I wanted to replicate.  


In the upper left hand corner... Isn't it gorgeous?

The wreath reflects a lot of what's big at Pottery Barn this season - ribbon, words, and a very organic feel, which I love this time of year.  When everything living goes dormant it's nice to bring out the beauty in the browns that are left behind.  So I adore dried berries and twigs and things of that nature that can be spruced up for the holidays!

So this is how my wreath turned out.


I love it.  Although, I need to find a better paint pen.  Mine didn't  bleed, but there's a residue around my letters from the paint?  Which I'm hoping just needs to dry out.  We'll see.

I used a twine vine for my wreath.  You know how it comes all rolled up in the package?  Well, I left it that way.  Kind of a different look for a wreath.  And the rest is simple, I just wove my ribbons in and out, in and out.  Tucked the ribbon in that I had written on, tied on a raffia bow, and I was done.  Lovely, don't you think?

Don't forget to enter the CSN giveaway here!!!  It closes at midnight EST on Friday!!!
Linking up at Sew Dang Cute  and Tatertots and Jello!

09 November 2010

Giveaway with CSN Stores!

~THIS GIVEAWAY IS NOW CLOSED~


Let's cut right to the chase, shall we?  CSN is giving one of my readers a **$45 gift certificate to use on any product from any of their stores!!!   I wish travel were in my future because I would love an excuse to buy a new suitcase from them.  Their polka dot and giraffe prints are so fun and girly!  (Who else is stuck sharing gender neutral luggage with their hubby?)  But that's not all CSN sells.  You may remember another fun giveaway I had with them for a chalkboard wall decal and some very artsy toy wooden blocks...  Aside from darling home decor and baby/kids items like those, they sell furniture, kitchen and dining, bed and bath, home improvement, patio and garden, lighting, heatlh and fitness, pet, office, and school supplies!  So be sure and browse thoroughly through all their sites - Luxe by csn, All Modern and Cookware - are a few to look for).

This giveaway is open to all US and Canadian residents (yay!).  The giveaway will end this Friday, November 12th, at midnight EST.  Winner will be announced Saturday morning.  To be eligible leave a comment and include your email address if it's not otherwise accessible.  FOR ADDITIONAL ENTRIES:

- become a follower of My Many Colored Days
- announce the giveaway on your blog

That's 3 chances to win!!!  Good luck!

**Gift certificate does not cover shipping.

Linked up here:


~THIS GIVEAWAY IS NOW CLOSED~

08 November 2010

When did life get so exhausting?

I remember when I began blogging 4 (gasp!) years ago, I had so many thoughts to share.  I had time to sit and think and then share those thoughts while my baby(ies) napped (boy, they were GOOD nappers).  Of course then life felt busy, but now it just feels insane.  I freaking sprayed my daughter's gym shorts with febreze this morning because I'd forgotten to wash them this weekend!  How bad is that?  Anyway, I've got a backload of unfinished projects and I'm super tired, so all you get from me today is this brief anecdote.  And a little shout for joy that I've almost reached 200 followers.  And an announcement that to celebrate such I'll be hosting a giveaway starting tomorrow.  So come back and enter!!!

05 November 2010

Indian Corn Swag


This is one of those projects that just had to evolve, know what I mean?  I started out with one idea, which led to another, and another.  So, a little more timely and frustrating, but I LOVE the end result.

I am making a thanksgiving banner, so I originally thought I'd make this a swag that I could hang.  I didn't have enough indian corn for it to make a statement, though.  It looked a little puny against the wall by itself.  And I didn't want to hunt down more indian corn, or have to wire any more if it together.  I posted this pic last month from Country Living magazine.


Well, I have tons of sap buckets laying around, so the idea was born to hang a swag around the rim of one of my buckets.  

Easier said than done.  Hanging anything around something that tapers in hard.  Thank goodness for the little hole drilled in the back of my bucket (since they were originally hung on trees to catch sap, this is a signature feature of sap buckets).  Hey, I sounded like Martha Stewart just then - giving you a bit of history and all. ;)

I digress.  So I wired my indian corn together, just a few at a time.  I suggest reinforcing the husk to the corn with some hot glue, a few of mine popped off while I was connecting them together.  I ended up with 4 bunches of indian corn wired together, and then I wired each of those pieces together.  I tied a piece of twine onto each end of the swag so I'd have something to tie around the bucket.  Using the hole in the back of the bucket, I was able to anchor the twine onto something to keep the swag from drooping too much in front.  I hooked a paper clip over the front of the bucket and under the middle of the swag as well, so it was anchored over the edge of the bucket in front, too.  Make sense?  Sorry if it doesn't because I didn't take a picture of it.  I was too busy swearing under my breath. ;)  Just kidding!  Sort of!

So now my swag is on my bucket and all I see is a hot mess of wires wrapped here and there.  To cover them up I wove ribbon in and out of the husks.  Love how that looks!


I tied a few pieces of ribbon/strips of fabric to the ends of the swag too.  So now it's cute from behind, as well.


So what do you think? So glad this didn't turn into a craft fail!


02 November 2010

Lego Party!!!

Hey gals.  How was your weekend?  We had so much going on, but it was a really fun few days.  Especially after a week (and still going) of illness.  For Drew it was constant lego heaven.  You saw his Halloween costume, right?  Well he also had a lego birthday party.

As already posted, here is what the invitations looked like:


And here is the rest of the decor.  Paper plates are cheap, cute, and resemble lego studs on the walls and windows.  The circle shaped balloons were a must!


These bricks are actually juice boxes wrapped in construction paper and covered with foam dot stickers. Thought that up all by myself.  So proud. :)


I found the straw decorations here for free!

I got these fillable glass bricks at Hobby Lobby and filled them with green sixlets.


A simple banner made from white paper plates and Drew's name in a bonified lego font (called legothick).


I found all sorts of great lego art on google images by Nathan Swaya.


Drew's lego cake was made using vanilla oreos as studs.  A lemon cake and frosting mix were already yellow, so very little effort in finding the right color.


More paper plates on the front door! 


I found the minifig head printable here (GREAT site by the way, same one I used for the straw decorations)!


As guests arrived I had them create some lego art.  We branched out into a polka dot theme with the decorations, so there were sticker dots, and these fun marker dot pens and pom poms to create with (as well as some coloring pages I found on lego's website).


Once everyone had arrived and had a chance to make a picture, we sat down and played a game.  Each child got 5 lego pieces and formed a circle.  The first child had 10 seconds to build something with his 5 pieces and when the timer went off, they passed it to their right and that next child built upon the first child's creation with their 5 lego pieces, and so forth, until all the kids had added on their pieces.  It took a few tries for them to get it, but once they did they had a lot of fun.


For our next game we had a lego drop.  The kids formed 2 lines up in our balcony over the fawyer.  With 3 lego pieces each, they competed against one another to see which team could make the most legos fall into their bucket.


There are lots of great party ideas here.

Our last activity was the biggest hit, of course, and that was free play with all of Drew's legos.  Here they are with their proud creations.  


Drew blew the candles out on his cake and opened gifts before sending his guests home.


They each received these lego plate notebooks as a thank you for coming to his party.


The pencil toppers are just blown up versions of the straw decorations.  I got the idea for the notebooks from a craft show in Austin last Spring.  LOVED the idea so much that it was then and there that I knew I needed to convince Drew to have a lego party (which didn't take much).

I bought the plates and lego pieces from the "pick-a-brick" section of lego's website.  They are 18x18. Drilling holes in them was a cinch.  Binder rings are available at most craft stores or in bulk from home office supply stores.

Another great birthday party down.  I get a bit of a break now... next one won't be until April!  I'll be ready!

linking up here:


handmade projects

Show and Tell Green