Showing posts with label mod podge. Show all posts

04 February 2011

Playroom Redone

Visit thecsiproject.com

So here is my first update following the flood.  Our upstairs areas got the worst of it, because the water heater that leaked was in our attic (we have 2, the other one is in the garage, and that one leaked last summer).  After replacing the ceiling and sheetrock they of course needed to repaint as well, so we decided to give the room a facelift with a new color.  

Here is a before pic from when we moved in a couple years ago,


and here it is now.  


Isn't the blue refreshing?  I. LOVE. IT.  I can't believe I left it colorless for so long.  Such is life.

 Since I also had to refinish or replace several of the letters from my alphabet border, and I'm pretty sure I never posted it on this blog to begin with, I am entering this post into the CSI Project this week. :)

Also linking up here:

Join  us Saturdays at tatertotsandjello.com for the weekend wrap 
 up           party!

01 February 2011

His and Hers Valentine's Swag


Oh my goodness, what's a girl gotta do to get a little creative time???  I've been creating this swag in my mind for weeks.  I'm happy to say I finally have something to show for it.  And I am giddy with how it turned out.  Hope you will be too...

I got these little white buckets in the $1 aisle at Target last year.  Knew I could do something with them, but not sure what.  Eventually the idea of some sort of swag or advent thing came to mind.  But advent calendars are so overdone... by myself included!  Plus, I only had 7 of them.  As I began decorating them though I had an a-ha moment - I could make his and hers buckets!

Loving the mustache craze right now - so I knew I had to put those on the boys' buckets (3 boys - my 2 sons and my hubby).  But for girls it took a while to come up with something gender-specific.  I was playing around with cupcake liners along the inside of the buckets when it occurred to me that I could use the liners as skirts on the BOTTOMS of the buckets.  So clever am I, no? ;) So I made 3 of those too (one for each daughter, and myself).

Materials:
felt stickers (on sale right now at Hobby Lobby - red heart shapes)
felt heart outlines (not stickers, I just glued them on)
miniature buckets (I've seen them at various places!!! and if you can't find a color conducive to V-Day, mod podge them or spray paint them!)
cupcake liners
sharpie (for the stache)
tissue paper
ribbon

Really the trickiest part of this little project was tying on the buckets - getting them evenly spaced and to all face forward was tedious.  But I'll take you through the previous steps as well.

First I stuck my heart-shaped velvet stickers and outlines on... front and center of each bucket.  Then I used double stick tape to attach a cupcake liner to the bottom of the girly ones.  And I took a marker to the boy ones and drew on various versions of mustaches (below the felt hearts).  Next I tied the buckets to one long piece of ribbon.  Double tie each one to be sure it stays in place!  Last I stuffed each bucket with some natural-colored tissue paper.  This will hide whatever goody I put in there on Valentine's Eve. ;)


I added a few extra strands of ribbon above my swag, and tied on a few scraps at the end.  To take the gender specificity a but further I tied a short piece of black tulle to either side of the boy buckets (they look kinda like bow ties to me - would be cute tied to the top, too), and a pink ribbon/white ric rac duo to the top of each of the girl buckets.  Perfectly frilly and handsome - each one!


Enjoy!!!

PS - See me HERE today!

Linking up!


Show and Tell Green


Join  us Saturdays at tatertotsandjello.com for the weekend wrap 
 up           party!


20 October 2010

Monogram Door Sign, Halloween Style


I've walked by the cutest magnetic boards in Hobby Lobby a few times now, just waiting for them to go on sale.  When they got black and white polka dot ones in the store, I was giddy.  And I grabbed one practically as soon as they put up the 50% off sign.

My Halloween wreath has seen better days, so I thought this would be a fun substitute this year.  And I kind of like it hanging on the INSIDE of my door for a change!

I left the board as is, it came with the fun green ribbon and everything.  But I glued on the first letter of our last name to personalize it.

The letter is made of chipboard.  Unfinished, it looks like this:


Only $1, .50 if you get lucky and they go on sale.  Chipboard was perfect for this project, especially since it is lightweight.  

I covered my letter in orange contruction paper first ...  orange because I was going to use orange glitter on top.  If you cover your letter in whatever color glitter you are using, it's not as big a deal if the glitter gets rubbed off in a few spots.

Trace your letter {BACKWARDS} onto your paper, cut, flip, and mod podge onto the surface of the chipboard. Let dry for about 15 minutes.  Apply Triple Thick over that.  This is what Triple Thick looks like, so you don't spend forever searching for it the first time, like I didn't. ;)


The Triple Thick gives this project a more finished look, which is nice since we used cheap chipboard and cheap construction paper in our first 2 steps.  It dries shiny, which is fun with the glitter.  Apply your glitter generously over the surface of the Triple Thick.  Pat it down a bit and let dry overnight.

In the a.m. you can apply your letter to your board however you like.  I used hot glue because it is what I had but I am sure something like Gorilla Glue would work better. :)

At last, enjoy!!!


Linking up with:


23 September 2010

BOO!


I'm kinda excited about today's project. It was so fast, and it's fun, and I scored a deal in the process.

All you need :

cardstock/posterboard/sizing
fabric
frames

There are several takes on this idea. In years past I've done each letter in a different font and mounted it in a frame. This year I wanted something a little different. While perusing Hobby Lobby, I found these small, square (6x6 to be exact), padded bulletin boards, complete with darling gem studded pins. AND THEY WERE 50% OFF.  Perfect!

I found a font I liked (this one is Adobe Caslon Pro Bold) and printed out my letters on cardstock. You'll need something with a little substance. Honestly, cardstock is a little thin. Print out on regular paper and then trace onto poster board, cardboard, or you could even use sizing since we're working with fabric as well.

Cut around you letters carefully and use as a template (opposite side down) on the back of your fabric. Trace with marker and cut out fabric. Then apply fabric to your letters using you preferred mounting agent. I used mod podge in matte.  Because I'm not much of a matchy, symmetrical person, I used 3 different fabrics with the same color scheme.  I could have used different fonts, too... but a lot of the more cutesy or ornate fonts would have been difficult to cut out of fabric.  And you don't want to go too over-the-top or it gets gaudy-looking.

If you go with card stock to back your fabric (and maybe even poster board), you'll want to let your letters dry between 2 sheets of wax paper and weight them down over night (to prevent curling).


When they're dry, mount however you'd like!  In individual frames, on these fabulous bulletin boards from Hobby Lobby, on a banner, or directly onto the wall... go wild. ;)  What I love about the bulletin boards is that I can easily change the word for, say, Christmas...

(JOY, anyone?)

:o)

Linking up with:


BWS tips button

19 February 2010

Stamp Initial

This projected was entered into:

Visit thecsiproject.com


I love letters and I love typography.  Once upon a time I designed fonts for a scrapbooking website, now I design them for myself. :)

I have words and letters all over my house.  Actually, it's brinking on the edge of overboard, lol.  I came up with this idea while watching iCarly of all things.  Hey, you can spot a good idea just about anywhere, know what I mean?  Anyway, in their kitchen are letters all over the wall and some of them look like big stamps, the old kind like they used with printing presses.  And so this idea was born.  I needed something tallish and skinny for this window beside my front door and I think this is just perfect!

Want to make one of your own?  Here's how!

Materials I used:

6x12 in. canvas
3 coordinating scrapbook papers
(distressing) ink pad
mod podge
cardboard
pencil
scissors

The first thing I did was cut a scrap piece of paper the same size as my canvas.  Then I sketched out my initial, using the edges of the canvas to dictate my size.  I wanted my letter to be as big as my canvas so I made sure it met all the edges of my "canvas".  I cut out my letter and then used it as a template on some cardboard.  If you have an old box, this is a great way to recycle it.  The purpose of the cardboard, in case it isn't obvious, is to give the same 3-D effect that a real stamp would have.

I cut out my cardboard initial.  Then I traced the template onto the scrapbook paper I wanted to cover my cardboard initial with.  When I traced the template onto the scrapbook paper, I traced it a little wider in size, so I had some edges to wrap around the cardboard initial.  It might have been more accurate for me to just measure and additional 1/4 in. all the way around, but I'm not very particular and like to be done already. ;)


I then traced my canvas onto a 2nd piece of coordinating scrapbook paper (for the base), and the edges of my canvas onto a 3rd piece of coordinating scrapbook paper (to hide the sides and add a pop of unexpected color).

Next I mod podged everything together!  Started with my base/canvas.  Let it dry well.  Then I mod podged the edges of the canvas.  Let it dry well.  Then the surface of my cardboard initial.  Let it dry well.  Then the edges of the initial, wrapping as I went (this is messy!).  Let it dry well (detecting a pattern here, are ya?). I inked (or distressed) the edges of the canvas, and the initial.  And then I hot glued the initial onto the covered canvas base.  Since the cardboard is thick, it is more secure with hot glue than with mod podge.


Lastly, I put one last coat of mod podge over everything.  Be sure the let the distressing ink dry before you do this, or it will smudge!  I have wondered if it is better to distress/ink on top of mod podge.  But I haven't tried yet.  Will it dry or is it like writing with marker on certain surfaces; it just stays wet?  If anyone has tried it, let me know!

I used a plate rack to display mine, stacked on top of some books... but the canvas will hang nicely on the wall as well.  If you're really ambitious, I think this would be a cute way to display a child's name in their room!

Enjoy!

I am linking up with:


27 January 2010

Valentine's Ideas #2

Photographer or not, anyone can take these cool shots and frame them for Valentine's Day.  (And it escapes me now where I got the idea from to photograph my child doing sign language.  It's out there somewhere!  Thank you to whomever you are!)

You can also frame your cool photograph in style using these ideas.


If you have a boring lackluster frame, consider adding ribbon or lace or even a scallop edge using simple kraft paper to spruce it up.


Another idea is to mod podge something with a pattern over an old frame.  Here I used my own printer to create this word collage of "i love you"s.  Courier New font worked well for my taste.

Enjoy!

If anyone is interested, I've decided to sell these images for $20 each.  Contact me for more info at photosbylei@yahoo.com.  

Linking up:


monogram

15 January 2010

the new craft room revealed, part 1

It's taken me too long to get this up!  Truth be told, I am always adding something here and something there in my house.  But for now this room has reached completion.  It will take me a few posts to show all the fun details.

Today I am focusing on my 2 most motivational words, which I've hung on the wall: inspire and create.

I may or may not have used hot glue to get these letters to stick to the wall.  Ok, I did.  This after trying small nails, sticky tack and even glue dots.  And yes, I used chalk to draw the scrolly pattern around it.  The letters came plain, and I painted and distressed them myself.


I really love how "inspire" turned out.  I love to mix and match patterns and textures.  Love.  And instead of hanging them, I decided to sit them on top of the mirror and lean them against the wall.  A lot of you have made the mod podge letters, I am sure.  But if not, here is a quick tutorial:

materials you'll need:

scrapbook paper
scissors
pencil
mod podge
wall letters
brayer

First, trace your letters onto the FRONT of some scrapbook paper (so you don't end up with backwards letters - don't worry you can erase the pencil lines later).  Cut the letters out.  Apply a coat of mod podge onto the wooden letters, working quickly, and smoothing evenly.  Lay your scrapbook letter over the top.  Using your brayer, smooth out any air bubbles trapped under the scrapbook paper.  Let dry for 10 minutes or so.  Erase any stray markings.  Then apply a final coat of mod pdge over the top of your letters to give them a finished look.  Let dry a LONG time before handling/hanging.

Voila!  You're done.

Next up, my armoire turned desk!

Linking up with Blue Cricket and Today's Creative Blog!


12 January 2010

I got nuthin'...

... except this.


I made some monogram letters for my friend Char for a darling organizational project she conjured up, and she's featured it on her blog.  In return she made me one of her fabulous camera straps.  Have you seen them?  Check out the tutorial here.  I get compliments on mine all the time.

06 December 2009

Having creative friends, it's a good thing!

Let's face it, the best ideas come from other great ideas. I do believe as Tolstoy said that "art is imitation". We have to have seen something beautiful in order to know how to recreate beauty.

I am fortunate to have many creative friends. They inspire me and help get my own creative juices flowing. And we take care of each other... nurturing each other's ideas, helping bring them to fruition. Sharing our talents.

Char at Crap I've Made recently recreated these awesome peace ornaments from PB. I had been eyeing some fun ornaments in the Ballard Designs catalog, so I followed her lead and recreated my own spin off incorporating the peace sign.

Here's theirs:
Photobucket

And here's mine:


I even have a few simple clear ball ornaments along with that I simply painted peace signs onto using glitter glue (you know, the cheap stuff your kids like to play with?).

Now I'm not as neat as Char. I didn't cover my edges or anything. I also don't do great, detailed tutorials with step by step pictures. I just don't like to, lol. But i will tell you exactly what I did, and I will show you more pictures and other ideas that have spun off this one.

Materials used:
cardboard
dove template (see below)
scrapbook paper
silver sharpie
mod podge
triple thick
brush for application

First, trace your template onto cardboard or other stiff backing.


Cut out and repeat with your scrapbook paper.

Before cutting out the template drawn on your scrapbook paper, find yourself a cup that is about the right sized circle for your distressed peace symbol. Find a corner to trace the rim of the cup on - you want just a hint of it to show. *Lightly* trace your circle and fill in the remainder of the peace sign. Get your silver sharpie out. If you look at mine closely I just barely shaded in my peace sign, I used quick, short, straight brush strokes on either side of the single line I'd drawn with my pencil, keeping the thickness even all the way around. I realize not everyone can freehand this kind of thing, but it really just takes a little bit of practice. You might want to play around with a scrap piece of paper first. :)

Now you are ready to cut out your scrapbook dove and mod podge it onto your cardboard backing. Now, I call these ornaments but mine are not actually hanging on my tree. I opted to stick them in with evergreen boughs in various places around my house - in a bowl as a centerpiece, and on my mantle. If you want it to serve as an actual ornament, you will obviously need to punch a hole before you apply the mod podge.

Let the mod podge dry about 15 minutes and apply your triple thick as a top coat. let the triple thick dry for at least 20 minutes. The triple thick is shiny, so it makes the ornament look classy, not like you just slapped some paper on an old piece of cardboard! Love that.

Here are some additional pictures!

In a bowl on the center of my craft room table (and the big reveal on my new craft room is coming very soon):


A spin off - just brown craft paper with silver polka dots:


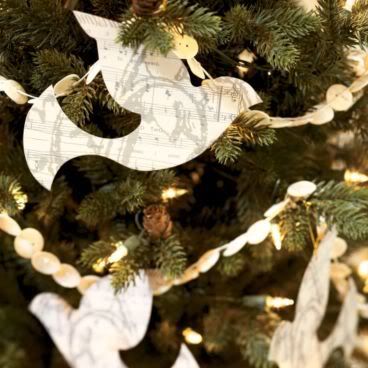
And since I was really feeling the natural color scheme Ballard has going on this year, I made a paper chain:


Lastly, here is a full shot of my mantle, with little silver birdies tucked in there, a crystal bead wreath, some ornaments up inside my sconces, and who knows what else to come... I'll continue to add to it, probably:


Enjoy!!!

*This project was entered into the contest at:

Visit thecsiproject.com