Showing posts with label creative tutorials. Show all posts

16 October 2011

Painted Pumpkins and giveaway announcement!

Well - I did it.  I made myself sit down and make something this week.  Actually, I made a few things.  I've been missing my paint brushes, fabric and tulle (oh my!).

I hadn't painted pumpkins in a while.  And I needed something to do last week with my kiddos for family night.  You can see their pumpkins here (as part of my photography post at Brown Paper Packages).   My porch this year is predominantly black and white, so this is what I came up with for my own this year:


The striped one was easy... I just followed the lines of the pumpkin. For the chevron pattern I actually used electrical tape. Trying to decide if I think it looks good that way or if I should paint the pattern. The polka dots are painted. And the damask pattern I found on google images. I printed it out and copied it onto the pumpkin. All 3 pumpkins took me about 30 minutes to finish. And I used craft paint, which dries quickly. So it was a fast project.

Here's the rest of my porch... tutorial for the wreath coming up in a few days!


{Just love my big ole spider!!!}


One more thing - there will be a great giveaway here Tuesday!  Let's just say that if you have a little girl age 4-6 yrs. you are definitely going to want to enter!

See you then!

30 September 2011

Have a little fun with your photos

I took some darling (if I do say so myself) pictures of my nephew a while back while he was staying with us for the weekend.  He is at that perfectly delicious chubby age where all you want to do is keep them naked and kiss all their soft rolls!  I knew I wanted to capture the details - his cute, chubby little hands, his beautiful long eyelashes, his roly poly legs... and I knew that I wanted to compile them in a fun and uniquely personal way for mom.

When my kids were little their aunt took some snapshots of them and set them to the words of favorite children's books.  I always loved the idea.  And since I am a photographer I set out to find the perfect words to go with all of Callister's cute new pictures.  I settled on Counting Kisses, by Karen Katz.  Of course, it shall now be named "Counting Kisses With Callister". :)

All I did for these pictures was add a solid colored block to the right side of each image, using photoshop.  You can select a portion of the picture to be covered up and then filled in, or add a block using an enlarged template, depending on the composition of your image.  It's really simple, especially if you already know the basics of photoshop.


These can be printed out and put in a photo album, or made into a book through Shutterfly.  What a fun memento of baby's most darling stage!  

Other books that would work great for this project:

I Love You Through and Through - Bernadette Rosetti Shustak (another good baby one - this is the one my sis-in-law used)
Here Are My Hands - Bill Martin Jr. and John Archambault (great for a preschooler)
Blue Hat Green Hat - Sandra Boynton (think how much fun a toddler would have with this)

Linking up with Tatertots and Jello!!!

27 September 2011

Christmas Dove Ornament Tutorial

Ahem.  Hello. :)  Yes, I know this must look a little crazy.  I fall off the face of the planet for a couple months and then come back in September with a Christmas ornament tutorial.  Lol.  Actually, the tutorial is old.  I am bumping it up for Parenting Magazine, who wants to use my dove template in an upcoming article.  Maybe though, this is just the kick in the pants I need to get back on top of this blog.  I do miss it.  For what it's worth - in short - life is good.  Just busy, busy with my photography business and my 4 children.  It's hard to do it all... my favorite quote as of late: "You can do anything, but you can't do everything."  Wise words.

Anyway, on with the tutorial!

I came up with this idea after eyeing some fun ornaments in the Ballard Designs catalog a couple years ago, so I created a knock-off.

Here's theirs:

Photobucket

And here's mine:


I added a few simple clear ball ornaments that I simply painted peace signs onto using glitter glue (you know, the cheap stuff your kids like to play with?).

For the dove ornaments -

Materials used:
cardboard
dove template (see below)
scrapbook paper
silver sharpie
mod podge
triple thick
brush for application

First, trace your template onto cardboard or other stiff backing.


Cut out and repeat with your scrapbook paper.

Before cutting out the template drawn on your scrapbook paper, find yourself a cup that is about the right sized circle for your distressed peace symbol. Find a corner to trace the rim of the cup on - you want just a hint of it to show. *Lightly* trace your circle and fill in the remainder of the peace sign. Get your silver sharpie out. If you look at mine closely I just barely shaded in my peace sign, I used quick, short, straight brush strokes on either side of the single line I'd drawn with my pencil, keeping the thickness even all the way around. I realize not everyone can freehand this kind of thing, but it really just takes a little bit of practice. You might want to play around with a scrap piece of paper first. :)

Now you are ready to cut out your scrapbook dove and mod podge it onto your cardboard backing. Now, I call these ornaments but mine do not actually hang on my tree. I opted to stick them in with evergreen boughs in various places around my house - in a bowl as a centerpiece, and on my mantle. If you want it to serve as an actual ornament, you will obviously need to punch a hole before you apply the mod podge.

Let the mod podge dry about 15 minutes and apply your triple thick as a top coat. let the triple thick dry for at least 20 minutes. The triple thick is shiny, so it makes the ornament look classy, not like you just slapped some paper on an old piece of cardboard! Love that.

Here are some additional pictures!

In a bowl on the center of my craft room table :


A spin off - just brown craft paper with silver polka dots:


And since I was really feeling the natural color scheme Ballard had going on that year, I made a paper chain to "match":


Lastly, here is a full shot of my mantle, with little silver birdies tucked in there, a crystal bead wreath, some ornaments up inside my sconces, and who knows what else to come... I'll continue to add to it, probably:


Enjoy!!!

05 May 2011

Teacher Appreciation, Children are like cookies...

I literally threw this together at the last minute today.  But it came together so awesomely!

I got this from a friend YEARS ago.  If your LDS, this will make sense... we gave this away with some homemade cookies for a Stake Leadership Training meeting one year.  {I adapted it to say the following for my kids' teachers.}

Children are like cookies, they require certain ingredients and need to be baked.
However, they come in different textures and flavors...
Some are hard and need to be softened in milk.
Others are soft, chewy, and melt in your hands.
Some have little surprises tucked inside.
Some are rolled and cut into perfect little shapes.
Others are dropped in big spoonfuls but take a shape all their own.
They are all wonderful and delightful, each in their own way.
We just need to find out how to "eat them up"... with milk, one bite at a time, or gobbled all at once.  They are individuals, which makes them interesting and fun.  It is our job to savor each one, like a sweet mix of cookies in a jar.


Thanks for taking such great care of my "little cookie"!


I gave each of my kids' teachers' their favorite cookies and tied on a cute red polka dot ribbon, this quote and these darling printables from Dimple Prints.


How fun would it be to find miniature cookie jars for this?  Perhaps I will remember that for next year!

14 April 2011

Laverne and Shirley inspired t-shirt


Sigh.  I just got home from the ER where my son got 3 staples in his head!  Apparently life ain't gonna let up on me anytime soon, but let's talk t-shirts, shall we?

Here is Sasha's tee... my last one for a while.  Although I could probably do this in my sleep now.

She wanted her initial on it just like big brother's.  I used the Giddy-up font for this one.  And instead of the Tulip Soft Fabric Paint, I used Plaid's Simply Screen.  LOVE IT.  It went on so nice and thick.  Didn't take nearly as many coats as Tulip did.  In the end, I think it looks like I bought it rather than made it.  The quality is SO GOOD!


This shirt reminds me of Laverne and Shirley.  Anyone else old enough to remember that show?  Laverne had a pretty scrolly "L" embroidered on all her clothes.  So fun.


If you missed the other 3 kids' t-shirts, look HERE, HERE and HERE.

{bunny impression}

Have a great day! 

10 April 2011

Rock and Roll Tee

Oh my word.  What a week I have had.  First of all, Austin allergies are BRUTAL.  Armpit of the world when it comes to allergens.  So I've been dealing with that... I came down with a lovely sinus infection mid-week, but I'm feeling somewhat normal again now that I've got some antibitoics in my system.  I haven't had to go to the dr. for any kind of illness in over 2 years!  Also, my husband has been travelling a ton. It's really hard to be sick when you are a single parent!  So - all that going on and I'm in the middle of super busy portrait season... families want their pictures done before it gets (too) hot.  Seniors are scrambling to get their senior pictures done for graduation announcements.  You get the picture.  Stressed-I-am.  My eye has been twitching all week and I feel like a crazy lady who belongs in a movie about a crazy lady.

We are home from church today because we've had Fifth Disease at our house. (You thought I was done!)  I don't know who's gonna break out next, so the 2 healthy kids are home with me today.  Did you know that with Fifth Disease you are contagious BEFORE the rash appears?  How annoying is that? 

Anyway, I thought I might catch up on my blogging this afternoon.  You know, since I'm finally sitting down.  Lol!  And since I've got a couple projects I haven't blogged about yet!

After I entered I am Momma's "Let's Hear it For The Boys" t-shirt contest my other son started bugging me to make him a tshirt too.  He's 8, almost 9, so coming up with a concept for a painted tee that wasn't too juvenile for him was a challenge.  But I did it. 
 And he loves it.

{Rock on, dude}

Want to know how I made it?  OK!

06 April 2011

Cute photography prop idea

I've seen this idea on a few different photography blogs/sites and loved it.  So I went out and bought this chunky frame for 50% off at Hobby Lobby.  Spray painted it white.   And look how CUTE it is as a photography prop.


Now I am thinking I need one in every color!

Speaking of photography, head over to Brown Paper Packages today for some photography tips by me!  You can find me at Brown Paper Packages on the first Wednesday of every month.

Linking up:


04 April 2011

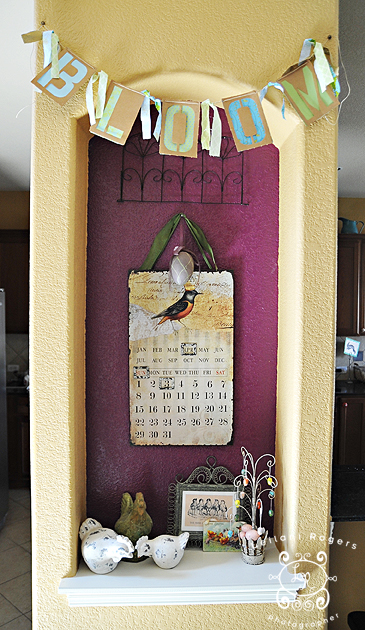
If you hang it, it will come... BLOOM banner!

So we are in between seasons here in Tejas.  And my lawn and yard show it... things are beginning to fill in, the grass is returning to it's usual shade of green.  To help move things along I thought I'd make a little BLOOM garland for my home. :)

Materials:

{stencil kit purchased at Office Depot}

{fabric cut into 1 in. strips}

{plus fine twine and scrapbook paper of your choosing}

All I did was place scrapbook paper behind each stencil and secure with double sided tape.


I threaded the fine twine through the letters (holes were made using a bamboo skewer).


And tied some ribbon on each end and in between the letters.

Simple, just the way I like it.  If you prefer something more frilly, then add some rosettes as well!

Enjoy.

30 March 2011

Fitting holiday decor into your home and your color scheme

You love holidays and like the festive look of holiday decor but how are you supposed to tie the pastels of Easter into a home with warm jewel tones?  Or for that matter, the reds and pinks of Valentine's Day?  Oranges and blacks of Halloween?  Also, how do you keep your decor sophisticated when so much of what is out there is cheap and more like party decorations than anything else?  Ok that last bit was a little snarky.  Lol.

For one thing, you certainly don't need to stick to any particular color scheme for any holiday.  That's one pretty obvious answer.  But that limits you quite a bit.  I usually run into this dilemma around this time of year.  My home definitely changes from time to time... my friends joke that it looks different every time they come over.  But that's not because I'm a shopaholic and am constantly buying new stuff.  I rotate things around (ok, so I do have a lot of things) but I make new things (on a budget) and I make simple changes to accomodate the seasons.  I'm going to share a few of those tips with you for Spring and/or Easter decor.  Because my home is not conducive to pretty much any color scheme you see this time of year.  My home has a lot of warm and jewel tones and bright popping colors.  So to add in white feels blah to me, and to display pastel things feels wasteful, because I don't really like pastel colors all that much, plus they are too "cool" against my warm colors!

My tip for tying in different color palettes is to start with determining your most common color or color group in your home, and in the new color scheme you want to introduce.  For me, at this time of year, that would be blues/yellows/greens.  They crossover into the pastel palette, but don't clash with what I have going on in the rest of my home, even though they are in much brighter shades.  As much as I love a little pink, and as popular as it is this time of year, it just doesn't work in my house (except of course in my daughter's room!) - so I stay away from it.

Here are some examples of how that fits into my home... all these pictures are taken in and around my kitchen because that is where I tend to focus the majority of my holiday decorating.  It also happens to be one of the "brightest" spots in my home, as far as color goes.  You'll notice that I round things out with a lot of neutrals.  Can never go wrong with neutrals!

Here's a big picture of my kitchen.  I have a lot of oranges/citrusy colors in there.  I cleared off my counters (which also housed a lot of red and turquoise to compliment and give dimension to the citrusy colors on top of my cabinets), and focused all my lighter Spring decor down on that level, separating it from the citrusy pallette up high.  So, separating color schemes as much as you can is one way of tying several color schemes together.


28 March 2011

The BYU t-shirt

It's pure coincidence that I made this t-shirt for my daughter last week (for higher education day).  I don't watch basketball, but I hear that BYU was in an NCAA tournament a few days ago, and there has been a lot of buzz on facebook about some guy on their team named Jimmer, who is apparently very good.  Lol.  That is the extent of my knowledge!   But this tutorial may be fitting for some of you who do follow that stuff and/or are good, loyal BYU alumni. ;)

So I had a lot of trouble with this t-shirt.  First I tried using bleach, as I stated in my previous t-shirt post.  And it bled underneath the freezer paper something awful.  On both this and the big d, little d dinosaur shirt.  So I had to start all over on both, and decided to try Soft Tulip Fabric Paint.


Worked much better for me!

21 March 2011

Make Mine Spring!


Hey guys!  I have a fun, thrifty spring idea for you!  I found this fabulous papery ribbon at Hobby Lobby recently.  50% off of course.  And knew I had to come up with something "springy" to do with it.  Since I have been in purge mode (spring cleaning anyone?), I am finding all sorts of things I can repurpose.  Like extra mason and jam jars.  Jars + ribbon + mod podge = fun springy votives!  Now I just need some sand and some tealights, and my porch will be sprinkled with a touch 'o spring.

{the ribbon}


{I twisted some wire around the lip of one of the jars and made a handle}

Cute, huh?

Linking up here:
The Girl Creative

craft


topsy turvy tuesdays


16 March 2011

The Pom Pom Frame

So I had quite the scare this week.  I dropped Brigitta (that's my camera).  Serious panic set in as I inspected her from top to bottom, bottom to top, side to side.  She was ok.  Phew.  But when I got home and tried to eject the battery for charging, it wouldn't come out.  Ack!!!  There's a teensy little crack on the edge of my camera right where the battery door opens.  So the fit is rather snug, but I was finally able to get the battery out and I think I've come up with a solution for easing her out more smoothly until I can get the camera fixed (if it's even fix-able).  Anyway, threw a bit of a wrench in my blogging plans for the week (my client shoots took precedence)... hence my time away from here.  Although, it also happens to be Spring Break, and I have been enjoying laying around doing nothing.

Haha!  Like that ever happens. ;)

Anyhow, I finally figured out what to do with the fun pom pom frame I posted several days ago.  Thank you all for your input!  The green center won!


I made a twinner for it using just the opposite colors... green background, pink center!  It looks so cute in Sasha's room.  Wanna see???


I found a darling celery green quatrafoil pattern to compliment the damask pattern in the pink one.  I think I need to move the wire piece above the one on the right to above the window... not entirely sure yet what I'm gonna do with it now that I've got something hanging on either side of that window (used to just be something on the right).  My home is very organic, constantly changing, so I'm in no rush!

Ok - so a quick rundown on what I did to make these... really so simple I feel patronizing giving a detailed tutorial to all you fabulous creative mamas!  But here goes.

My materials:

2 16x20 frames
14 sheets of white tissue paper per frame (28 all together)
1 sheet of pink tissue paper
1 sheet of green tissue paper
a 20x24 remnant of pink damask pattern: Brother Sister Studio
a 20x24 remnant of green quatrafoil pattern: Brother Sister Studio
hot glue

First of all, I followed the Martha Stewart tutorial for the flowers HERE.  Only I pulled away the tissue all to one side.  Does that make sense?  So my flowers would be flat on one side and not completely round.  I also added up a wadded up sheet of tissue paper to the center.  Yep, that's all I did.  Ok I didn't roll into a tiny ball like I would trash, but I creatively wadded it.  Lol.  Kinda ruffly looking. ;)

I stretched my fabric over the backing in the frame and hot glued the edges to the back of it.  Slipped the now covered backing into the GLASSLESS frame.  Secured the prongs that I hate so much but were perfect for this project.  And hot glued my flower to the center of each frame.  Once in the center and in 4 spots around the flowers where you couldn't tell I had done so.  The flowers needed some reshaping and I even reached in and stapled the edges together in a couple spots to keep them round and fluffy.

Enjoy!

Linking up:

Visit thecsiproject.com