28 February 2011

Bottlecap Earring Tutorial, shared at She Wears Flowers!


Today I am going to show you how to make bottlecap earrings.  I've seen some pretty fun things done with bottlecaps, but my heart went pitter patter when I came across a package of them in the jewelry aisle, already drilled and fitted for necklaces, bracelets and earrings.  Since I have a pre-teen I was pretty excited to play around with them and see what I could come up with.  I started with earrings but I am sure it won't be long before she's asking me for a complete matching set!!!  Heck, it may not be long before I make myself a complete set.

Here's what I started with:


{By the way - I bought all my supplies at Hobby Lobby.  Seriously - cannot go wrong with that store - as something is always on sale!}

First I trimmed a background piece to lay inside the bottlecaps.  On this pair I used music because we're a very musical family and my daughter is currently studying the piano.


I found that using a mechanical pencil worked best for this step, so that I could really get under the lip on the bottlecap and accurately trace the size I needed around it's base.  I just extended the lead a tad more than normal to get a close tracing.  {Of course most of you are probably much more evolved crafters than I, and have the perfect size hole punch.}

Next I secured the circles with some Gorilla Glue, because I didn't want them to float up when I poured in the Dimensional Magic in the next step.


Ya know, it didn't work great.  So I tried hot glue and it did the trick.  But maybe I didn't let the Gorilla Glue dry long enough.  I am kind of an impatient crafter!  

Next step is to apply your Mod Podge Dimensional Magic.  


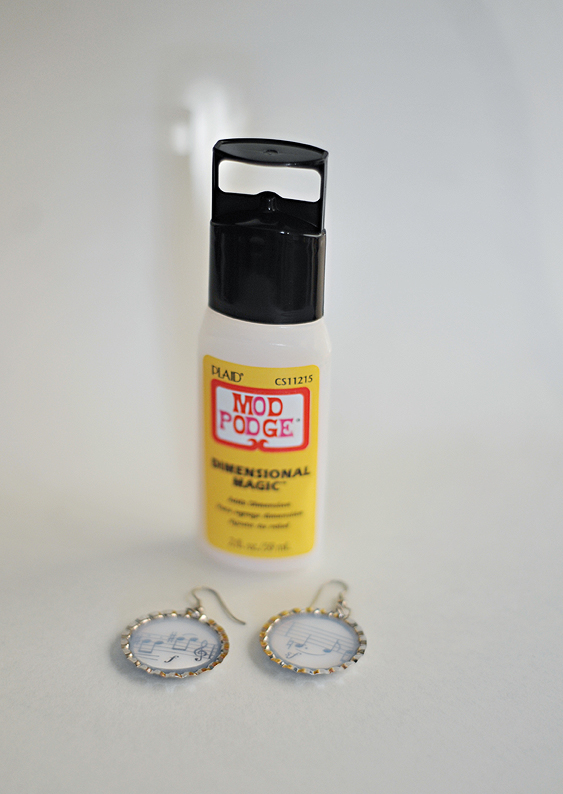
This stuff rocks.  It is so versatile!


Here's how it looks like when it is drying.  Kinda cloudy.  But I assure you it will dry clear and thick as glass!

Since the Dimensional Magic takes a few hours to set, you have time to play around here on your next step; there is no rush.  I broke out the glitter and some charms.


Set my charms in there first:


And in order to make sure I could direct where my glitter went, I poured it into a folded piece of paper before sprinkling it on:


That worked ok.


I wanted it to stay more finely to the edges, but they are still pretty and "magical looking" (what my daughter asked for).  

Next I am trying something a little more colorful.  Perhaps for moi. ;)


{Isn't this great scrapbook paper?!  You could go with just about any of these great colors!}


I think green glitter would be so pretty with that shade of orange.  


Or how about a rainbow assortment as a bracelet?

This is such a fun, versatile project.  You could put little pictures in there.  Maybe of your kids.  You could add words, names, initials.  


This would be perfect for my 4 year old. And it's screaming for hot pink glitter!

I love projects that you can make your own and personalize.  And I hope you all have a lot of fun with this!!!

Linking up!

mmm button

Tip Junkie handmade projects 

”topsy”topsy

26 February 2011

Prize Ribbon Tutorial

So I have a new calling at church.  (For those of you who don't know what that is, it's a "call" to help in one of the LDS church programs.)  I'll give you one hint what that calling is:


  Woohoo! It's taken me a while for my heart to really be in it, I'll be honest.  When I was asked if I would be willing to help in the scouting program I was told that my creativity was needed.  And until now, I haven't really had many opportunities to use that creativity.

I was put in charge of decorations for the Blue and Gold Banquet this year.  Our theme was "Helping Others".  The boys cut out templates of their hands, and wrote ways of helping others on each one.  We scattered these on each table and had blue and yellow balloon centerpieces.  Nothing over-the-top.

The boys brought canned food donations to give to a local pantry.

We also had a cake decorating contest... fathers and sons only.  And here's where my creative need was really fulfilled.  Because I made the cutest (if I do say so myself) prize ribbons for each participant in the contest.


My husband thought they were too girly.  I don't think so, do you?  The boys really seemed to appreciate them.  And they said they wanted creativity!  This is my brand of creativity. ;)

Want to know how to make them?  I thought so!

Here's what you need:


streamers


hole punches


pins


ribbon!

... and ye trusty old glue gun, aluminum foil and cardboard (all of which weren't nearly cute enough to take pictures of).

First step or "layer 1" of your prize ribbon is a ruffle of streamer.  I shaped mine accordion style into a circle like this:


... and secured the center on top and bottom with a dab of hot glue.

Then I added my layers of circles.  First came the scalloped circle (2 in. wide):


Then "layer 2" - a 1 1/4 in. circle punched from cardboard.  Mine was saved from the back of an old picture frame.

I wrapped the cardboard circle with aluminum foil:


The last circle layer was punched with a 1" circle punch and says #1 on it.  I used white cardstock and a font called "rosewood" for the #1s.


Add each circle to the top of your streamer yo-yo with a dab of hot glue, in order of layer 1, 2 then 3.

Last step, hot glue your ribbons to the back.  Use a variety!  They are cuter that way. :)


I also added another cardboard circle to the back of the prize ribbon.  Gave me something sturdy to hot glue my pin to:


My 4 yo diva wasn't about to let me get away with not making a "girly" one for her, and so I present the frilly girly version:


She proudly wore hers to the banquet!

How cute would these be as Mother's Day gifts?  The "girly" ones of course.  Or party favors for a baby shower?  You could use whatever color theme the nursery is!

And in case you want to know what my son's cake looked like:


He and his uncle (just returned from a 2 yr. mission for our church) decorated it together, because my husband was out of town!  It's misleading, but that is indeed a SWEET pizza, made with a sugar cookie base, red icing for the sauce (do you have any idea how much red food coloring that requires?  enough to cause hyperactivity, lol),  coconut shavings for the cheese, and rolled fondant for the pepperoni and green peppers.

I also gotta show you these cute certificates each boy got with his prize ribbon:


Found them HERE.

Linking up here:


Tip Junkie handmade projects

mmm button

”topsy

”topsy”topsy

24 February 2011

I lied.

I said I'd have a tutorial for you today and I lied.  Well, I half lied... I did make something cute, but I didn't feel like typing out a tutorial.  Perhaps tomorrow?  

Here's what I DID feel like doing today. ;)


You can't blame me, right?!


My little girl woke up with a mysterious fever this morning.  And then by noon she was perky again!  And the rain was just about to give way to sunshine...

I acted on impulse and did a quick 15 minute shoot with my adorable little girl.

Which picture is your favorite?  I can't decide!