30 March 2011

Fitting holiday decor into your home and your color scheme

You love holidays and like the festive look of holiday decor but how are you supposed to tie the pastels of Easter into a home with warm jewel tones?  Or for that matter, the reds and pinks of Valentine's Day?  Oranges and blacks of Halloween?  Also, how do you keep your decor sophisticated when so much of what is out there is cheap and more like party decorations than anything else?  Ok that last bit was a little snarky.  Lol.

For one thing, you certainly don't need to stick to any particular color scheme for any holiday.  That's one pretty obvious answer.  But that limits you quite a bit.  I usually run into this dilemma around this time of year.  My home definitely changes from time to time... my friends joke that it looks different every time they come over.  But that's not because I'm a shopaholic and am constantly buying new stuff.  I rotate things around (ok, so I do have a lot of things) but I make new things (on a budget) and I make simple changes to accomodate the seasons.  I'm going to share a few of those tips with you for Spring and/or Easter decor.  Because my home is not conducive to pretty much any color scheme you see this time of year.  My home has a lot of warm and jewel tones and bright popping colors.  So to add in white feels blah to me, and to display pastel things feels wasteful, because I don't really like pastel colors all that much, plus they are too "cool" against my warm colors!

My tip for tying in different color palettes is to start with determining your most common color or color group in your home, and in the new color scheme you want to introduce.  For me, at this time of year, that would be blues/yellows/greens.  They crossover into the pastel palette, but don't clash with what I have going on in the rest of my home, even though they are in much brighter shades.  As much as I love a little pink, and as popular as it is this time of year, it just doesn't work in my house (except of course in my daughter's room!) - so I stay away from it.

Here are some examples of how that fits into my home... all these pictures are taken in and around my kitchen because that is where I tend to focus the majority of my holiday decorating.  It also happens to be one of the "brightest" spots in my home, as far as color goes.  You'll notice that I round things out with a lot of neutrals.  Can never go wrong with neutrals!

Here's a big picture of my kitchen.  I have a lot of oranges/citrusy colors in there.  I cleared off my counters (which also housed a lot of red and turquoise to compliment and give dimension to the citrusy colors on top of my cabinets), and focused all my lighter Spring decor down on that level, separating it from the citrusy pallette up high.  So, separating color schemes as much as you can is one way of tying several color schemes together.


28 March 2011

The BYU t-shirt

It's pure coincidence that I made this t-shirt for my daughter last week (for higher education day).  I don't watch basketball, but I hear that BYU was in an NCAA tournament a few days ago, and there has been a lot of buzz on facebook about some guy on their team named Jimmer, who is apparently very good.  Lol.  That is the extent of my knowledge!   But this tutorial may be fitting for some of you who do follow that stuff and/or are good, loyal BYU alumni. ;)

So I had a lot of trouble with this t-shirt.  First I tried using bleach, as I stated in my previous t-shirt post.  And it bled underneath the freezer paper something awful.  On both this and the big d, little d dinosaur shirt.  So I had to start all over on both, and decided to try Soft Tulip Fabric Paint.


Worked much better for me!

25 March 2011

Try, try, try again! Freezer paper stencilling...

I had fail after fail with this project.  I don't know why, but it didn't like me.  I'm happy with the end result, but it took 4 t-shirts, 3 different methods, and a whole lotta cursing to get there.

It all started with my daughter coming to me on Thursday morning and telling me that on Friday everyone was going to wear t-shirts from the college of their choice to school.  Ok, well - not a problem if she wanted to got to school at UT (we live in Austin).  You can buy a UT shirt at Goodwill or the grocery store... pretty much anywhere.  But no, she wants to go to BYU, which is where I graduated from.   Proud mama I am, but I dislike this 24 hr. notice business.  And it appears to be happening more and more often.  Grumble, grumble.  

Have no fear though, I'm pretty good with my hands.  I knew I could probably whip something up for her pretty quickly.  I've seen freezer paper stencilling tutorials all over the internet, but I went with the one my good friend Char wrote up at Crap I've Made.  I really liked the look of the bleach method, so I tried that one first.  As much as I love Char, her tutorial did not work for me.  Maybe she forgot to add that you must actually BE her in order for the tutorial to work.  In fact I tried her spray bottle method as well as a bleach pen method I'd heard of.  Neither worked.  Phooey.

So, going back to square 1 and back to Char's blog, because in the end I still trust her, I tried the painting method, using this:


Worked like a charm!  For whatever reason, my bleaching technique needs a lot of work!  That's ok though, paint and I are old friends.  I should never have strayed away from it to begin with!

Today I am actually going to show you the shirt I made for my son, because I am entering it into the "Let's Hear It For The Boys" t-shirt contest over at "I Am Momma, Hear Me Roar".  And it turned out much cuter then the BYU shirt, anyway.  Tomorrow I will show you the shirt I made for my daughter, along with instructions on how to avoid my series of catastrophes.


I Am Momma Hear Me Roar


The concept for this t-shirt came to me months ago, and it sat in the back of my mind until Adriana came to me with her request yesterday.  I figured I may as well make both t-shirts as long as I was at it.  The big D, little d stand for my youngest son's name.  But I also wanted to illustrate something else that started with "D" on the t-shirt.  And so I doodled and doodled both dinosaurs and dogs until I came up with this:


Love how my little guy rocked his shirt to school this morning!  He had me scared.  No, seriously... he roared a loud and terrible roar for this picture and I had to tell him to keep it down!  Lol.

Here's a close-up:


I love it.  Did you know that "RAWR" is how dinosaurs say "I love you"?  

It's true. ;)

21 March 2011

Make Mine Spring!


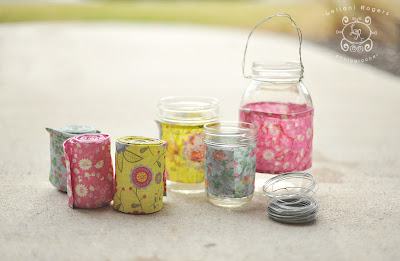
Hey guys!  I have a fun, thrifty spring idea for you!  I found this fabulous papery ribbon at Hobby Lobby recently.  50% off of course.  And knew I had to come up with something "springy" to do with it.  Since I have been in purge mode (spring cleaning anyone?), I am finding all sorts of things I can repurpose.  Like extra mason and jam jars.  Jars + ribbon + mod podge = fun springy votives!  Now I just need some sand and some tealights, and my porch will be sprinkled with a touch 'o spring.

{the ribbon}


{I twisted some wire around the lip of one of the jars and made a handle}

Cute, huh?

Linking up here:
The Girl Creative

craft


topsy turvy tuesdays


16 March 2011

The Pom Pom Frame

So I had quite the scare this week.  I dropped Brigitta (that's my camera).  Serious panic set in as I inspected her from top to bottom, bottom to top, side to side.  She was ok.  Phew.  But when I got home and tried to eject the battery for charging, it wouldn't come out.  Ack!!!  There's a teensy little crack on the edge of my camera right where the battery door opens.  So the fit is rather snug, but I was finally able to get the battery out and I think I've come up with a solution for easing her out more smoothly until I can get the camera fixed (if it's even fix-able).  Anyway, threw a bit of a wrench in my blogging plans for the week (my client shoots took precedence)... hence my time away from here.  Although, it also happens to be Spring Break, and I have been enjoying laying around doing nothing.

Haha!  Like that ever happens. ;)

Anyhow, I finally figured out what to do with the fun pom pom frame I posted several days ago.  Thank you all for your input!  The green center won!


I made a twinner for it using just the opposite colors... green background, pink center!  It looks so cute in Sasha's room.  Wanna see???


I found a darling celery green quatrafoil pattern to compliment the damask pattern in the pink one.  I think I need to move the wire piece above the one on the right to above the window... not entirely sure yet what I'm gonna do with it now that I've got something hanging on either side of that window (used to just be something on the right).  My home is very organic, constantly changing, so I'm in no rush!

Ok - so a quick rundown on what I did to make these... really so simple I feel patronizing giving a detailed tutorial to all you fabulous creative mamas!  But here goes.

My materials:

2 16x20 frames
14 sheets of white tissue paper per frame (28 all together)
1 sheet of pink tissue paper
1 sheet of green tissue paper
a 20x24 remnant of pink damask pattern: Brother Sister Studio
a 20x24 remnant of green quatrafoil pattern: Brother Sister Studio
hot glue

First of all, I followed the Martha Stewart tutorial for the flowers HERE.  Only I pulled away the tissue all to one side.  Does that make sense?  So my flowers would be flat on one side and not completely round.  I also added up a wadded up sheet of tissue paper to the center.  Yep, that's all I did.  Ok I didn't roll into a tiny ball like I would trash, but I creatively wadded it.  Lol.  Kinda ruffly looking. ;)

I stretched my fabric over the backing in the frame and hot glued the edges to the back of it.  Slipped the now covered backing into the GLASSLESS frame.  Secured the prongs that I hate so much but were perfect for this project.  And hot glued my flower to the center of each frame.  Once in the center and in 4 spots around the flowers where you couldn't tell I had done so.  The flowers needed some reshaping and I even reached in and stapled the edges together in a couple spots to keep them round and fluffy.

Enjoy!

Linking up:

Visit thecsiproject.com

12 March 2011

A big thanks and an announcement!


First of all - YAHOO on my photo at I Heart Faces this week taking 3rd place in the People's Choice contest for Best Face in February!  Thank you SO MUCH for voting for me friends!  I feel so fortunate to have such great support from you all!

Second of all, I've begun trading photography services for etsy store owners that are looking for high quality portraits to display on their shop pages.  For each product you send me (to keep) I will take 3 72dpi images of my little models in them.  And my kids are fabulous models... want to see?


(dresses courtesy of Embellish Kids Boutique)

Even my boys are comfortable in front of the camera:


So if you are interested in trading services, please contact me at photosbylei@yahoo.com.  I have a turn around time of 2 weeks, less than that in many cases!

09 March 2011

I heart faces - People's Choice Photo Challenge


Hi friends!!!  Got a shameless request for you... I've entered this photo into the "I Heart Faces | Best Face in February" contest.  Here's the link to the contest... I am currently #424 on the list!  And I'm beat so far by almost 50 votes, so I need you all to work me a miracle in order to win!  I think I deserve it, don't you????  Voting closes tomorrow night so hurry, scurry!

UPDATE:  I am in the top 10 so far!!!  Currently #6 with a margin of 13 votes between me and 2nd place.  I can totally do this but I need your votes!

07 March 2011

Knock-off in progress...

I saw this in Hobby Lobby and fell in love with it.  Perfect for my budding little dancer's bedroom.  Although, not for $50!


And this is my version-in-progress.  I've spent .25 so far. ;)


04 March 2011

Pom Pom Wall Art

I'm working on a fun project for my girls' rooms.  This one is for my youngest daughter's room and I'm not entirely sure which direction to go with it.  So weigh in, fellow crafters!!!

A) leave as is:


B) line frame with this fun green polka dot ribbon:


C) Zig zag a mix of ribbons across the frame:


D) Add a center to the flower:


Let me know what you think and I'll post the reveal in her bedroom and a tutorial in the next couple days!!!

Linking up!


01 March 2011

Announcing: a photography series at a famous blog near you!


Leilani Rogers, Photographer

I am so excited to announce that one of my favorite blogs and long time internet friends, Kierste from Brown Paper Packages, has asked me to start a monthly photography series at her blog!  The first post will be up tomorrow... and I really hope all of you {ALL of you} will participate in our discussions!  Photography has not only been a great skill to have as a mom and in recent years as a professional, but as a blogger as well.  And I am thrilled at the chance to pass along some of my knowledge to other creative bloggers.  We'll talk about everything from lighting and composition, to how to get great candid shots, to getting out of that darn auto mode "rut", to how to take polished looking pictures of the stuff you make for your blogs!  There will be questions and {hopefully} answers, lots of advice, opportunities to show your stuff, and basically just a wonderful opportunity to learn and enjoy photography together!  So grab a button, come on over and join in the fun!  First Wed. of every month. See you there!